Blog
Setup a Raspberry Pi Minecraft Server
Minecraft is more fun when you have a server to play on. With a Minecraft server up and running, you and your friends can meet up and team up as you explore the same Minecraft world. But running a server can sometimes be a pain, too. Servers are best when they’re always on — you don’t want to shut down your shared Minecraft universe every time that you close your laptop. Having the server running on your desktop can be a burden, too, depending on how beefy your PC’s specs are. Happily, the
This project requires a bit of tinkering with the Terminal. It also requires Java and — unless you’re planning to play only on a local network — requires you to set up port forwarding and run an internet-connected server. You’ll need a passing familiarity with
- Raspberry Pi 3 or 4. A
Raspberry Pi 4 with extra RAM is ideal. - Raspberry Pi power supply
-
Raspberry Pi HDMI cable, display, keyboard, and other peripherals - microSD card with Raspbian disk image installed
- Ethernet cable for wired internet connection (strongly recommended)
Gather up all of that, and we’ll get started!
Step 1: Install the Java Runtime Environment
Installing the Java runtime environment
To run a
There are security risks that come with running a server with Java, which is one reason why a
As a further security measure, it’s a good idea to make a separate user account on Raspbian for your server if you plan to use your
Once you’re logged into the right user in Raspbian on your
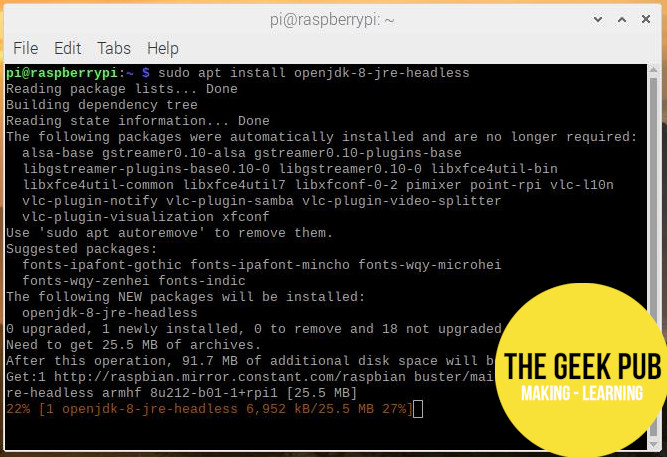
sudo apt install openjdk-8-jre-headless
We’ve chosen to install the “headless” version of the JRE because it’s a little more lightweight. The headless package is used when you don’t have to worry about graphics, which we don’t — all the graphics stuff will be happening on devices that you and your friends play on.
Step 2: Download Minecraft’s server software
There are a few different apps that can run Minecraft servers, but we’re going to keep things official and use the one that Minecraft offers for free on its website. Head to Minecraft.net and download the latest and greatest version of server.jar.
That will land server.jar in your downloads folder, but let’s not leave it there. Go ahead and make a folder for your server within the home directory. You can do that in File Manager or just type this command into Terminal:
mkdir Minecraft_Server
The mkdir command means “make directory,” and that’s just what Raspbian will do for you. The new folder will be right where we want it: in your
Now, grab the server.jar file that you downloaded and put it in the Minecraft_Server folder. It’s probably easiest to do that in File Explorer, though you can use the mv command in terminal if you’d prefer.
Step 3: Read and confirm Minecraft’s end-user license agreement
Let’s get back into Terminal. While in Terminal, we’re going to navigate to our Minecraft_Server folder and files.
Assuming you didn’t do anything funny when you created your Minecraft_Server folder, we should be in that folder’s parent directory (Home) already. You can double-check with the command ls, which will list the folders and files within the directory that you’re already in. You should see Minecraft_Server in there. We want to get into our new directory before we take any further steps, so let’s type this command into Terminal:
cd Minecraft_Server
Now that we’re in the right folder, we can issue commands that impact the files within this folder. We’ll type a command that starts our server:
java -Xms1G -Xmx1G -jar server.jar
And we will promptly get error messages. It turns out that we have to confirm that we’ve read Mineraft’s end-user license agreement before we can use our server. Alright, then, let’s do that! Read Minecraft’s EULA on Minecraft.net. Then, look in your Minecraft_Server folder for a text file named eula.txt. Open it up and change the line eula=false to eula=true. You can do this in the file explorer or within the Terminal with our favorite text editor, nano, via the command nano eula.txt.
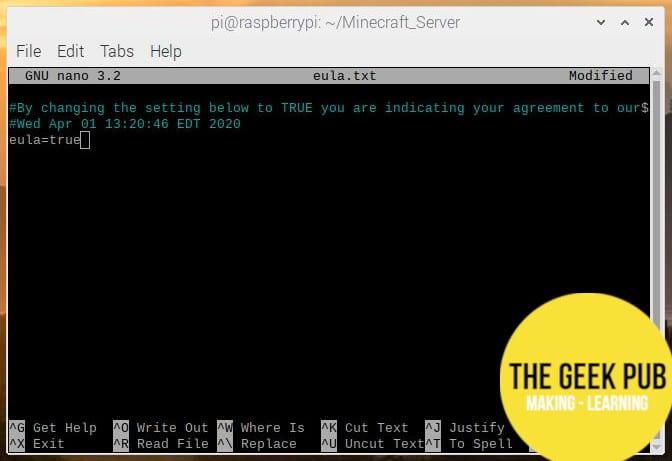
Setting eula to “true” in eula.txt
With “eula=true” in there, go ahead and close the file (if you’re using nano, that’s Ctrl+X), making sure to save the file on your way out.
We weren’t trying to waste any time by attempting to run the server before signing the EULA, by the way: the eula.txt file only appears after you try (and fail) to start the server.
Step 4: Start the Raspberry Pi Minecraft server
With the red tape and fine print all taken care of, it’s time to start our server for real. As we do so, we’ll also allocate some RAM for server.jar to use when it runs.
Our
We’re still in the Minecraft_Server folder (if you’re in a new Terminal window for any reason, get back to the right folder with the command cd Minecraft_Server), and our next command is the same one that we used to trigger the error messages in the last step. This time around, it should actually work. Here it is again — though you might want to read the explanation below it first, just in case you have to change any numbers in your version.
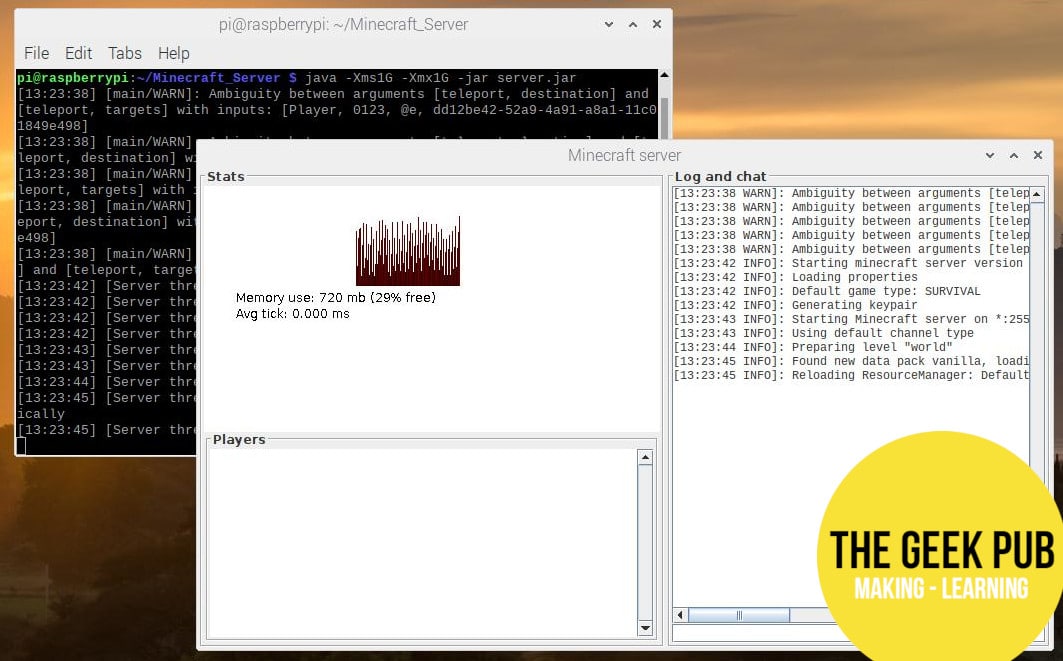
java -Xms1G -Xmx1G -jar server.jar
This command starts the server. The use of “java” lets our
If you’re using an older
Step 5: Adjust and connect to your Raspberry Pi Minecraft server
If all goes well, your server should be up and running smoothly. Now you can tweak settings on your
When you launch your server, a graphical user interface (GUI) will launch, too. You can use this screen to type in server commands and mess around with your Minecraft universe.
You don’t actually need the GUI, though. If you’d rather launch the server without it, you can append nogui to the end of the launch command, like so:
java -Xms1G -Xmx1G -jar server.jar nogui
You can also mess with default settings on your server by accessing the server.properties file within your Minecraft_Server folder. With your server shut down, just open the file with your text editor of choice. We’ll use nano:
sudo nano server.properties
Within server.properties, you can change settings like the maximum number of players and the default view distance. Just be careful not to mess up the file and break your server. When you go back and start up your server again, your new settings will be in place.
With your server up and running, you can now connect to it from another device running Minecraft.
With your
The Server Name doesn’t matter, so put anything that you’d like in that spot. As for the IP address, that will be the IP address of your
Click Join Server, and you should be connected — but only if both you and your server are on the same network. If you want to make your server available beyond your local network, you’ll need to take another step.
Step 5: Set up port forwarding
Our new Minecraft server is up and running. We can connect to it from devices on the same network and play to our heart’s content. However, we can’t yet connect to our server from outside of the network. If you want your server to be connected to the internet, you’ll need to set up port forwarding.
For this part, you’re going to be working with your network router. You can access your router through your web browser by entering the router’s address and entering your administrator credentials. Routers often use 192.168.1.1 or 192.168.1.254, but your router could very well use something else. Check your router for more details — it will likely have a sticker with its address and default login information.
As with the address, your router’s user interface may vary, so we can’t tell you exactly what you’ll see when you access its user interface in your browser. One way or another, though, you’ll need to find the port forwarding settings and set them up like so:
Service Port: 25565
Internal Port: 25565
IP address: YourRaspberry Pi ‘s IP address (find it in the Terminal on your Pi with the command hostname -I)
Status: Enabled
Protocol: TCP/UDP
It’s also good idea to assign your
You should also check out your server.properties file and make sure that “Server IP” is identified as your
With that, you should be able to access your
Of course, any time that you connect your network to the internet, you do so at your own risk. Java has had some security issues in the past, so be aware of the risks that come with setting up a web-connected server. Some Minecraft fans use VPNs to protect their privacy, though you should know that VPNs and Minecraft’s server program don’t always play nice with each other and that you may have some troubleshooting to do if you go that route.
And that’s that! Enjoy your


4.5
5
Thanks so much for writing this up. I have been wanting to setup a Minecraft server for my kids. I just inherited an older i3 chromebox (Asus cn60) from my dad which I installed Gallium OS on. Can I install the server on it using the same instructions? Thanks
I set this up, but I can’t connect to it. It shows it’s running but even entering in the IP address and port number in Minecraft it can’t find the server. I have port forwarding set up correctly on my router and even on the same network it just can’t find the server…
My Pi keeps rebooting when I start it up and it’s a 4g ram Pi pls help
3.5
4.5
Uhmm I keep doing it up to the point where I can’t see any Txt document for the “agreement” set info to “true” part? The other server download is there and transferred properly but no Txt agreement file?