Blog
How to Make an Arcade Machine: Part 1
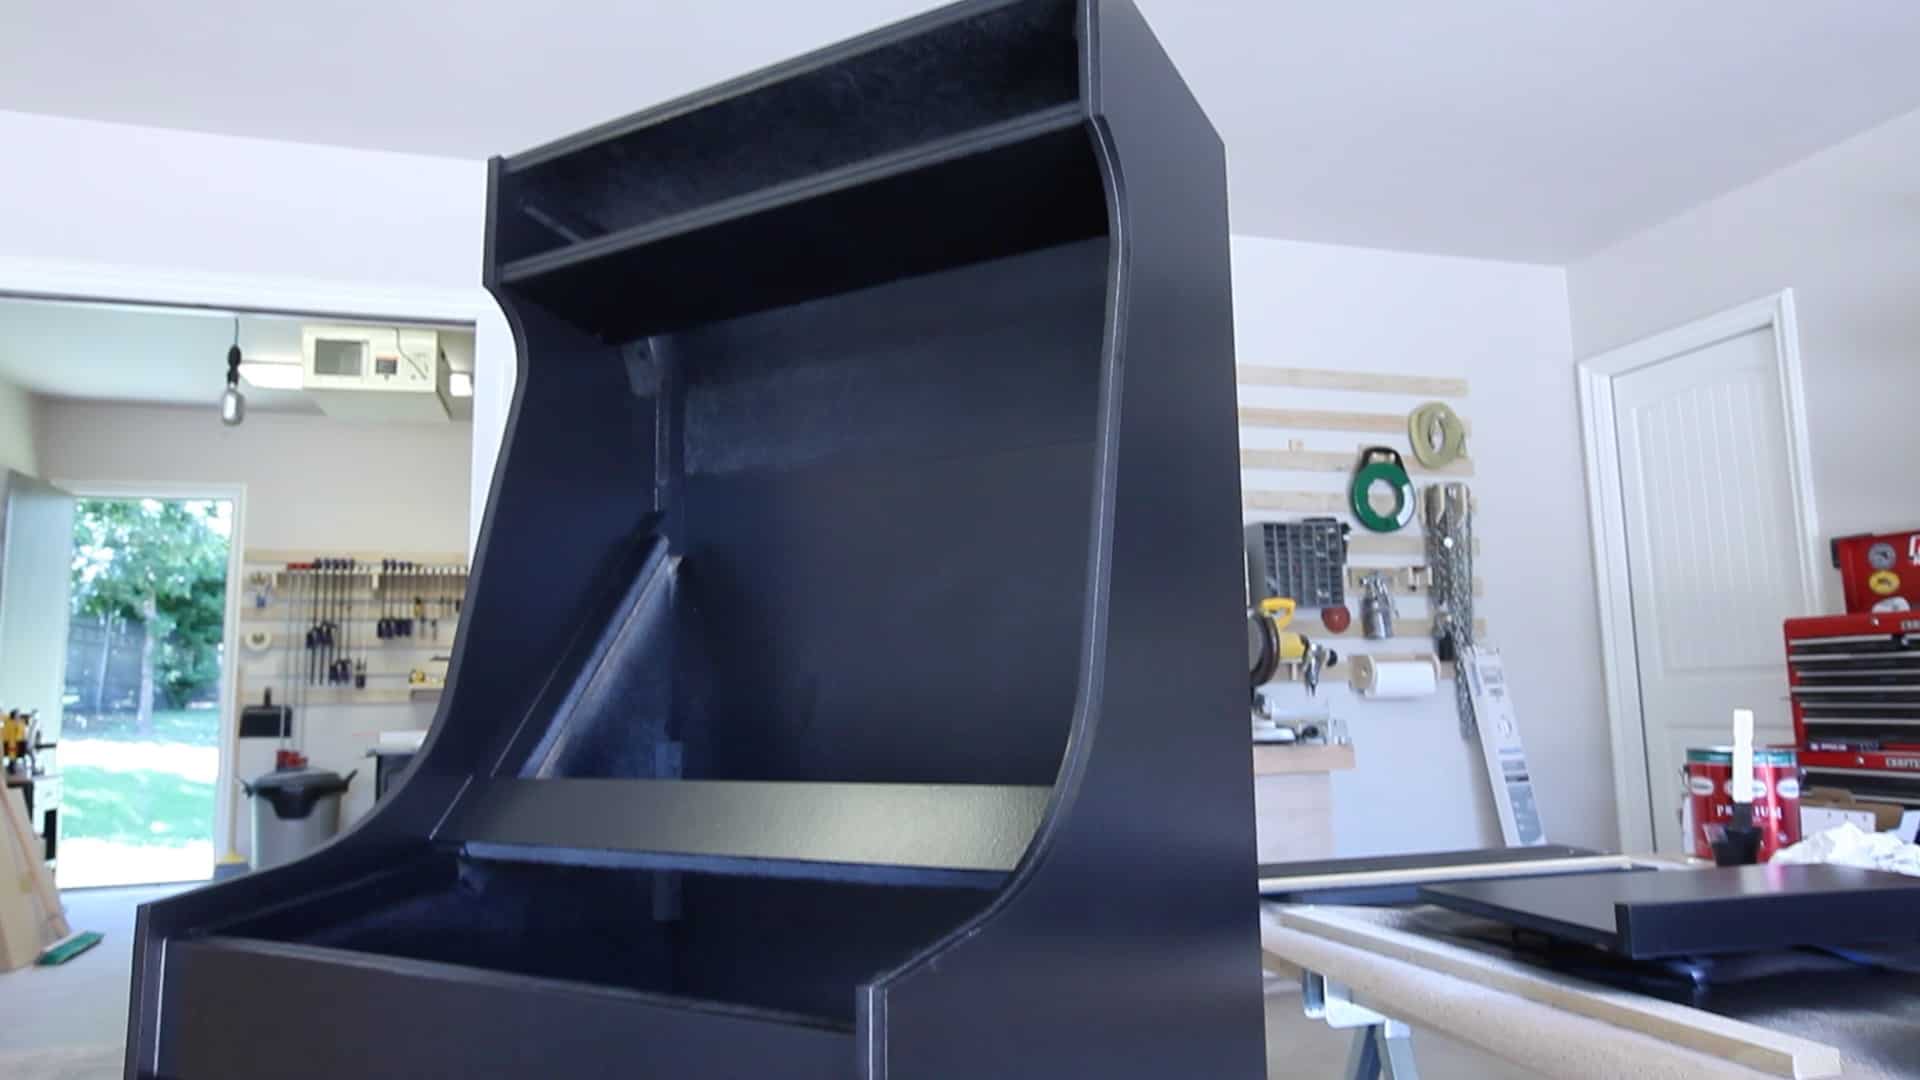
Making a retro (i.e. “Old School”) arcade cabinet is probably one of the most enjoyable projects I have done in recent years from a personal perspective. I grew up at the local mall in my tweens and teens, and I spent a whole lot of that time in places like The Gold Mine, The Forum Fair Arcade, or Putt Putt Golf and Games. Forum 303 Mall in Arlington, TX had the biggest arcade in town called the Forum Fair Arcade. It even had a full-size Merry Go Round in the middle of it. Most arcades when I was growing up were divided into two sections. Pinball and video arcades. I was a computer geek the day I saw my first computer. So naturally I gravitated to the video arcade section. I remember how upset I was when games started requiring not just one, but two quarters! I was pretty much grown by the time they started putting dollar bill changers on the games!
Watch the Arcade Machine Video (Part 1)
But when I was a kid arcade machines weren’t just at arcades. They were literally everywhere. Arcades were in every big box store, every fast food restaurant, every grocery store, and even in gas stations! I’d spend about 5 minutes wolfing down my corn-dog at Dairy Twin in Burleson, TX so I could spend the next 30 playing Xevious and Spy Hunter while my parents finished their dinner. Remember, kids didn’t have a mobile gaming device in their pocket or an Xbox at home. If you wanted to play good games, you had to go to them.
Arcades are very much a historical icon of the 80s. And I was basically an 80’s kid! So when the opportunity came along to build an arcade for my own home, I couldn’t pass up the chance. This is a project I have been wanting to do for at least a decade, but I’d never really had the opportunity to do it. This will be a three part video series. I’ll have plans available shortly after the last video is released.
Designing the Arcade
I decided for my arcade that I wanted it to be smaller that the original games. The arcade cabinets built in the 80s were at least 3 feet deep. This is because they used large CRT monitors. Today we have flat panel LED/LCD monitors allowing us to make much smaller cabinets. This will make my wife very happy as my arcade will take up much less room in the house.
My arcade machine is designed around a PC at its heart. It will be running Windows 8.1 and an emulation software called MAME. MAME stands for Multi-Arcade Machine Emulator. MAME emulates all of the different hardware that was custom designed for arcade machines throughout the years, and then runs the game software on top of the machine emulator. This is fantastic because it lets us play any arcade game we want on a single cabinet. Pac-Man, Galaga, Space Invaders, Xevious, all at the touch of a button. Even better than that, we can emulated Nintendo NES, Atari 2600, Playstation, etc. Today’s retro arcade cabinet can play a massive amount of games in one single console.
Even though I am building a modern version of an arcade, I still want it from a form and function perspective to be as retro as possible. For this reason I went out of my way to make the cabinet look old-school in its design. It even has a coin door on the front of it that accepts real quarters to start the games!
Building the Arcade Cabinet
Old school arcade cabinets were made from 2×4’s and plywood, painted and covered with graphics for the game specific hardware and software that was installed in it. Plywood is pretty hard to paint and completely removed the grain from showing through, so I decided to use 3/4″ MDF (medium density fiberboard). MDF didn’t really exist as we know it today when arcade machines were popular in the 1980s. However, MDF is much more paint-able surface than plywood. Its easier to shape, and isn’t prone to chipping out when cutting it with a jigsaw.
I sandwiched two sheets of MDF together and traced out my design onto the top one. Then I used a jigsaw and a guide-bar to cut both the left and the right side panels out at the same time. Take your time on the layout because if you mess up you get to buy two more sheets of MDF, instead of just one. Measure twice or three times. Cut once.
For the most part I assembled my arcade cabinet with nothing but wood glue and brad nails. The glue really does all the work. The brad nails just hold it until the glue dries. I did use screws in a few places where I wanted the option to disassemble it later (the back panel, for example). In order to make that happen I used 1″ x 3/4″ strips of MDF as attachment cleats between the corners. Pre-drilling for the screws is very important because MDF at those thicknesses (or thinness rather) are prone to splitting. You could certainly use real wood or plywood to make those strips with no worries about painting issues later.
Assembling the arcade cabinet is a little time consuming. But it is important to take your time and make sure everything is perfectly square. Otherwise you’re going to spend a lot of time later in the process trying to get things to fit. Spend the time here, and save a lot more later. I again chose to attach the sides panels with screws so I could remove or replace one in the future should that be necessary.
I also wanted my arcade cabinet to be very mobile, should I want to move it around. To make this possible I put casters on the bottom of my cabinet. Since I am going to put my cabinet on carpet, I am not worried about it moving during gameplay. However, I probably would not have used casters if the machine was planned to go on concrete, wood, or ceramic tile.
Most arcade cabinets use a PVC or rubber T-molding along the edges of all the wood. This was done for two purposes: 1) to provide a decorative finish, and 2) to provide a robust material for constant human contact that was somewhat soft. I wanted to emulate this look on my cabinet. To do so I purchased some 3/4″ T-molding from Rockler Woodworking. In order to install this T-molding on an arcade cabinet it has to be routed with a 1/16″ slot in the exact center of the panels. This requires a slot cuttin bit for your router. It’s very important to route some test pieces to make 100% certain that the slot is in the center of the panels.
I made a template for drilling all of the holes for the joystick and arcade buttons. This allowed me to simply use some 3M Super 77 spray adhesive to temporarily hold it in place whole drilling the holes. The super 77 if removed within 30 minutes or so leaves little to no residue, but be sure to clean it with mineral spirits before painting.
I used a 1-1/8″ Forstner bit to drill out the holes. All 20 of them on the control board, and two on the sides of the arcade cabinet for the left-right paddle buttons. 22 holes in total. I’ve found that Forstner bits make a much cleaner and faster cut that old school paddle bits. They also make a whole lot less dust. And when cutting MDF that’s a really good thing.
The only thing left to do is to paint the arcade cabinet. I chose a semi-gloss black latex paint from my local home improvement store. I try to use paint that can be cleaned up with soap and water whenever possible. To apply the paint I used my Fuji Spray Semi-Pro 2 HVLP sprayer. HVLP stands for High-Volume, Low-Pressure. HVLP sprayers don’t have a lot of over-spray like conventional sprayers or airless sprayers and lay down a very fine wet coat of paint. Think of it as a huge air-brush. It makes for a really nice finish quality. Before painting I laid down a single thick coat of Glidden GRIPPER primer and then sanded it to 220. If you want a glass like smooth finish on MDF, this is basically requirement.
Well that’s it for Part One of “How to make an Arcade Machine”! Come back for part two for the install of all of the electronics. In part three we will install the lighted marquee and all of the graphics!
Read Part Two of How to Make and Arcade Machine!
Read Part Three of How to Make and Arcade Machine!
Video Transcript
Hey guys! It’s Mike from The Geek Pub, and on this episode I’m going to show you how to make this awesome retro arcade cabinet that you can play all of your old school arcade games on. And if you stick around for part two, I’ll show you how to put the electronics in it.
So the first step in creating our arcade cabinet is to take two 3/4” sheets of MDF and sandwich them together. This will allow us to trace out and cut both side panels at the same time.
So I am just using a compass to ever so slightly round off some of the edges for a decorative effect.
In order to cut out the sides I’m going to use a jigsaw, and I’ve setup this guide bar in order to make sure that those cuts are straight.
In order to keep the weight down I’m gluing in these little 1 inch by 3/4 inch MDF strips. These will be the attachment points between the panels.
I’m putting these rolling casters on the bottom of it. I think they will make it easier to roll it around and move it when I get it upstairs.
I’m going to install this decorative T-Moulding along the edges. In order to do that I have to route a 1/16 inch slot along the side of this. And I need to do it now, because I won’t be able to do it later.
This is the control panel where the joystick and the buttons will go and I wanted to make sure that this was removable for maintenance in the future. So in order to do that I’ve added a couple of supports that will keep it in place while your playing the game. This also provides some extra support for the monitor stand.
So because the door is set back from the front of the cabinet I used these inset cabinet hinges so that when the door closes it sets back on both sides.
The barrel lock will allow me to keep the unit locked, and keep the kids out of the quarters.
OK. So in order to install the coin door, I’m going to need to cut a hole in the front of the front door. I’m going to do that with my jigsaw, but before I do I’m going to cut some pilot holes with my drill.
Alright. That looks like it fits pretty good.
Since the heart of this machine is going to be a Windows 8 PC, I went ahead and added a mouse and keyboard tray. That way I can configure the machine, as well as play games that require a mouse and a keyboard. I’ll go ahead and add a handle to it after we paint it.
OK. So all that is left to do now is drill all the of the holes for these little buttons and the joysticks. And I’ve created a little template that you can use. All you have to do is put a little spray adhesive on the back and stick it on. And I will include a copy of this on the website.
Now it’s time for a little caulk and a little painting.
Alright guys. Well that’s it for part one. Come back for part two and I’ll show you how to put all of the electronics in it. In part three we’ll put in the lighted marquee and apply all of the graphics.










What paint did you use?
Glidden black latex gloss. I shot it with Glidden primer first.
What are the measurements for the coin door hole please?
They are in the plans.
Hi Mike,
What kink of caulk do you recommend for these projects?
How much T molding did you have to buy? What length?
Hi Mike, did you cut any pieces of the MDF edging at angles? ie, 110 degrees etc.
Hi Mike,
This is awesome thanks for putting this up. I am looking to tackle this project over the holidays. My question to you is do you have a configuration for a trackball on the control panel? Would it be hard to add?
Curious what size monitor/tv you used in this machine? I dont remember seeing any mention of size. Thanks
So I am getting ready to start on this very project (with a Retropie), and I wondered if anyone has added a trackball to this configuration… I believe there is room on the button template to add one in the lower middle section, but was curious if this was a worthwhile addition. Thoughts?
2
0.5
4.5
Do you have anymore photos of Forum 303 Mall?
5
Where do you get your games from, I want the popular ones from the 80’s Donkey Kong, Pac Man, the food ole games.
Hey Keith, I’m pretty sure he can’t answer that here, but if you’d like I can steer you in the right direction. We can trade tips. I’m good with the programming side of this but a total noob with construction.
3
What size drawer slides did you use? Total noob here and I looked everywhere to see if I missed it. Sorry if I did.
Also, can you give us a link for your hinges for the front door?
I’d like to know as well. Having trouble finding inset hinges that work with this design.
3.5
What joints get the cauk? I can’t reconcile a cabinet that partially disassembles and one that has good fit and finish. I am still in the planning stage and I am at least a week out from buying the MDF. Maybe after it is assembled it will be clear what should be done.